
Hi! I’m Mallory, @queer.sewist on instagram. I started sewing because I wanted to create bright, fun, quirky, queer clothes that fit me. In this blog post I’ll be sharing with you how to create a reversible vest using the Ilford jacket pattern. One of the sides of the vest has a Marty McFly-esque woven puffer texture, and I’ll walk through how to create that texture. I am a very visual learner and this is my first blog post ever, so I hope everything I wrote makes sense and that it’s easy to follow. I tried to include lots of pictures to help along the way. Continue reading to find out more.

Inspiration
I was inspired by some ready to wear woven vests I had seen online. I loved the volume and texture that the woven pattern added to a traditional puffer vest, and of course I had the audacity to think “I can do that!”

Fabric and Supplies
To make my vest, I used about 5 yards of quilting cotton (in Kona acid lime), about 1 yard of denim scraps that I picked up from a fabric swap, and about 16 oz. of polyfil.
Making the quilted side of the vest
I started by making the woven/quilted side of the vest. I decided to size down one size, so I used the size XS pattern pieces.
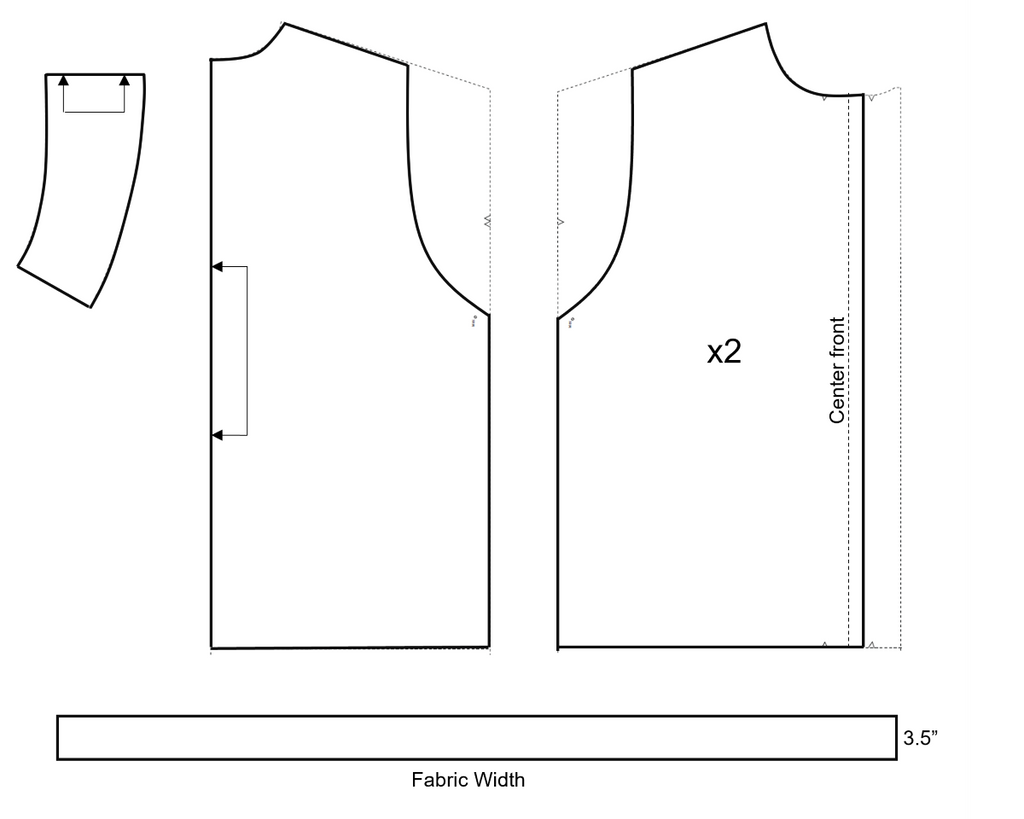
Cut the pattern pieces:
The amount of strips you need will depend on the size of your vest and the width of your fabric. I made a size XS and used about 4 yards of 45” fabric for the strips. To add the armholes to the front and back patted pieces, I started at the dot mark then drew a curve up to the shoulder - making sure the shoulder front and back are the same length. I found it useful to tape the pattern pieces together at their stitch lines and then draw the armholes from there. Below is an outline of the pattern pieces I cut
Mark edge and stitch lines on pattern pieces:
Sew the front and back pieces together at the side seams and press seams open.

To mark lines on front and back pieces I used a pen that erases with heat so I could remove the pen later by steaming the garment. Draw a line one inch from the bottom, then draw diagonal intersecting lines at 45 degrees. I started with the bottom of the middle back and worked my way out from there. Lines should be 3 inches apart. These lines are marked in the picture below.
Draw in stitch lines - this is where you will stitch the fabric tubes down for the first layer of tubes. In one direction, there should bea stitch line in the middle of every other square. Stitch lines are marked in the picture below

Create fabric tubes and fill with polyfil
Sew tube pieces right side together along both long edges with a ¼ inch seam allowance. Turn tubes and press.
For the first layer of tubes, draw stitch lines on the tubes 6.5 inches apart. Note: the stitch lines on the vest are only 6 inches apart - I added length to the tubes to allow room for the second layer of tubes to fit under them when weaving. Stitch the first line, stuff with polyfil, then stitch the next stitch line and repeat. You should end up with a long tube that looks like a fabric sausage where each sausage link is 6.5 inches long.
Take a break for an encouraging word from the seam ripper

Something I love about the Friday Pattern Company patterns is the seam ripper that encourages you throughout the instructions. Here’s an encouraging message from our favorite seam ripper.
Connect first layer of tubes to vest
Match tube stitch lines and the stitch lines you drew on the vest and sew tubes to vest pieces. Start at one end and work your way across.

Weave in the second layer of tubes
Once the first layer of tubes is in, you can then fill the remaining tubes with polyfil and weave them through the first layer. Pin the tubes around the edge then hand or machine baste around the outside of the vest. Trim tubes as necessary

Sew the shoulder seams together
Once you’ve sewn the shoulder seams together, now it’s time to work on the next side of the vest.
Make the second side of the vest
For the second side of the vest I used denim scraps that I got from a fabric swap. There was barely enough fabric for the vest, and I had to get creative with some of the pattern pieces.
Cut pattern pieces:
Cut the front, back, collar, and pocket pieces for the second side of the vest. I was limited with the fabric I was using, so I decided to cut the front and back pieces into upper and lower pieces. If you do this, be sure to add seam allowance. Cutting the front into an upper and lower piece also made the installation of the upper pocket flap easier. For the pockets I used the lower rectangular pockets, the upper rectangular pocket, and the upper rounded pocket flap. I had to piece my collar together with scraps because I ran out of fabric. Below is an outline of the pattern pieces I cut in denim (plus one pocket flap in the lining).

Add the pockets
I did double pockets for the lower pockets so I could put my hands in the pockets but they still have that traditional Ilford look. I have a tutorial saved in my story highlights on instagram for double pockets.
For the chest pocket, I sewed the front and lining of the pocket flap right sides together then turned and pressed. I then pressed and sewed the upper rectangular pocket to the lower part of the front piece about 0.75” below the edge.
I then added the pocket flap right on top and basted it in place before adding the top piece of the front. I pressed the seams upwards and top stitched

Make collar and baste in place
Sew both sides of the collar together and turn. Baste the collar in place

Press armhole seams inwards
Sew around the arm hole ⅝” from the edge and then press seam allowance inwards (this will make it easier when we close the armholes later on)
Before you combine the two sides together, the seam ripper has a message for you

Combine the two sides of the vest
Sew vest pieces together
Place the vest pieces right side together and sew together the center front and neckline. At this point - turn to check that there are no bumps and that you caught all the edges of the woven strips in your seam. I missed a piece of one of the woven strips and had to unpick that section and re-sew. Once you’ve fixed any mistakes, sew the bottom together
Turn right side out
Trim seams and clip corners then turn through one of the armpits. Carefully press the front and bottom seams. Do not use high heat because you don’t want to melt the polyfil
Finish armholes
Turn the armhole seams inwards and hand sew together. Now do a victory dance because you’re finished!
Before I finished my project, I added a label that says “Inefficient Flotation Device” from Inside Voices just so no one mistakes this bright yellow vest for a flotation device.

If you made it this far, pat yourself on the back - great work! I hope you enjoy your new vest as much as I enjoy mine! I’d love to see your makes, so please let me know if you follow this hack tutorial.


Leave a comment
This site is protected by hCaptcha and the hCaptcha Privacy Policy and Terms of Service apply.