
Sewing garments to reflect your unique style can be really rewarding, however, finding a sewing pattern that will fit your exact body measurements is rare. Sometimes you will find that your measurements fall into different sizes. That's where grading between pattern sizes comes in handy. In this blog post, we will guide you through the process of grading between and combining pattern sizes specifically for Friday Sewing Patterns (but can also be a skill you can use for other patterns).
Understanding your measurements:
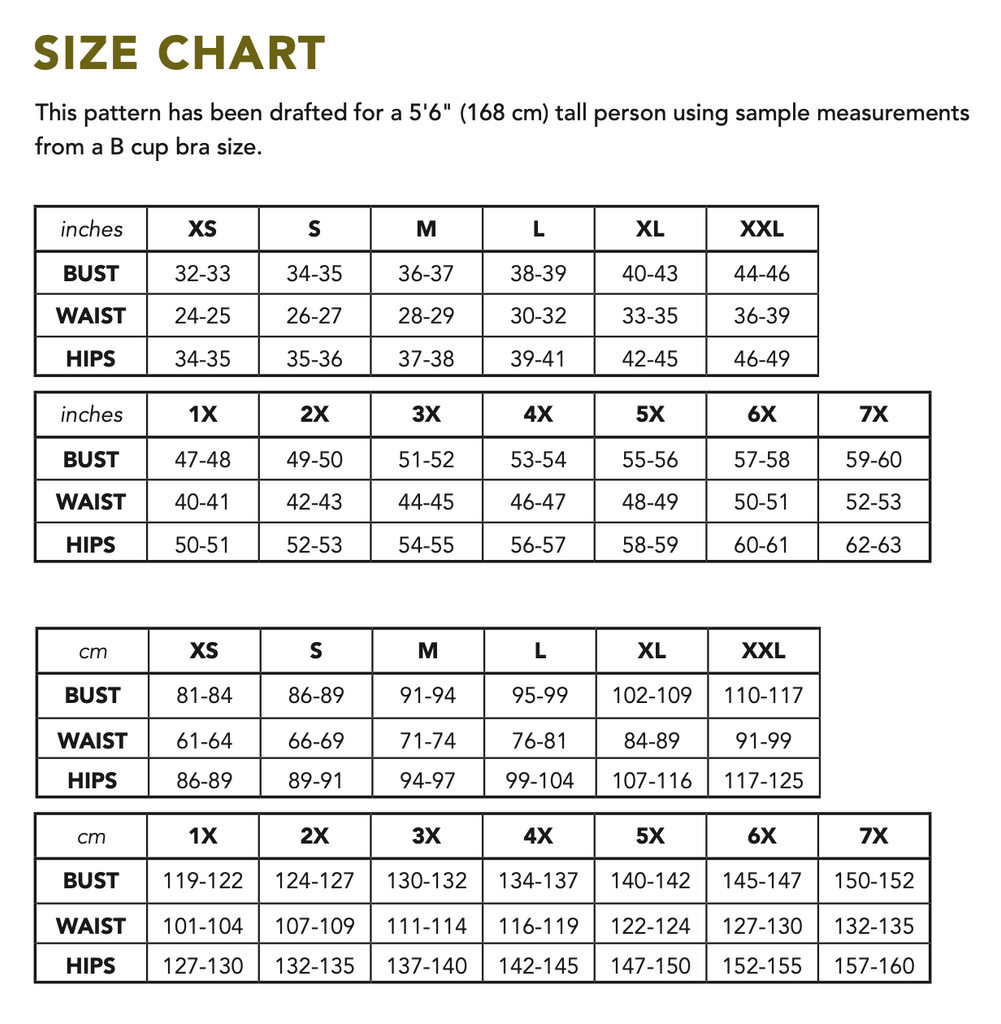
Before you begin grading between pattern sizes, it is essential to have accurate measurements of your body. Take your chest, waist, and hip measurements using a flexible measuring tape and refer to the Friday Sewing Patterns size chart to determine which sizes correspond to your measurements.
It's handy to take your measurements regularly as bodies can fluctuate and you don't want to risk cutting out lovely fabric, to find the garment doesn't fit.
When choosing a size you can refer to both the 'size chart' and the 'finished garment measurements'. All sewing patterns are designed with different ease in the garment, meaning the fit will be looser on some and tighter on others depending on the silhouette.
Example of a sizing chart from the Donny Shirt Pattern:

Pre-plan & check your pattern:
Carefully examine the pattern you've selected and identify the size range it covers. Refer to your body measurements and the size chart. As mentioned above, this can differ depending on the garment, the pattern company and the style. Once you can see where your body measurements lie, you can determine what size or sizes you need to cut.
In most cases, you want to work from your largest measurement, so for example if you tend to have a bigger waist to hip ratio, then you would cut a larger size for the hip then you would for your waist - and to get the garment to fit well you can 'grade' between those sizes so the make is made perfectly to your shape and size.
Grading Between Sizes:
If your measurements fall between two sizes, grading between sizes is a great way to ensure a precise fit.
This can be done in a couple of different ways; if you're working with a printed PDF pattern then you can amend and grade directly on your pattern piece, or trace off the pattern and grade during the tracing process.
Tracing method:
Start by tracing the pattern pieces for the sizes that correspond to your upper and lower measurements. Lay the pattern pieces on a flat surface and use a ruler to draw new cutting lines between the sizes, blending them smoothly. Make sure to grade all relevant pattern pieces, for example if you're making a top with a front and back, you would grade on both those pieces following the size lines. Most patterns have seam allowance included but always double check just in case.
PDF Printed Pattern Method:


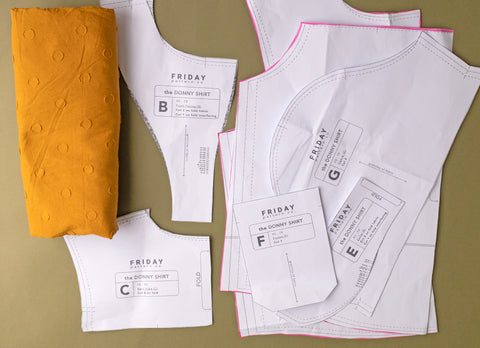
Once you have your printed pattern, cut around the pieces so you can work on them individually. You will need a highlighter pen and a ruler, ideally a quilting ruler or long ruler. On a flat surface, lay your piece out and highlight the line of your size all the way around until the side seam, this is where we will be grading between size. I'm showing this on the Donny shirt pattern between a size medium at the bust and a large at the hip.


Once you have drawn around the size you want, I have highlighted the size medium everywhere else, taking a ruler you can draw a line from the underarm seam, to the side seam hem between the medium and large size (or between however many sizes you need to grade between), and connect that line. This works well on a simple or boxy shape garment like this one because you only need to draw a straight line. Once that's done you can cut that piece out. Repeat the process on the back piece.
*little tip*
If a pattern has a 'cut on the fold' on the center back, and that piece is gathered in like the Donny Shirt, you can add extra ease to that centre back to give your more ease/fabric overall. The top can still be attached with gathers and you will therefore have more ease of movement to the hem/hips if the top.
Combining Pattern Sizes:
Combining pattern sizes is useful when your measurements correspond to different sizes for different parts of your body. For example, if your bust measurement aligns with a size 10, but your waist measurement aligns with a size 8, you can combine the two sizes. Follow the same process as above to grade between sizes, and this can be changed depending on if it's a bust increase or hip increase etc.

For more technically difficult patterns, like necklines, bust adjustments etc, this process is similar but can alter slightly depending on the pattern. Another great tip is to grade between notches. For example if you're making a dress, like the Saltwater Slip, but you want to grade between 1 size from the bust and waist to a larger size on the hips, use the waist notch and grade outwards (or inwards if it's a decrease) from that notch, just under the bust dart (see example above).
Test the Fit:
After grading between and combining pattern sizes, it's crucial to make a toile (a practice garment) to test the fit. Use inexpensive fabric similar to your final fabric choice to sew a mock-up of your garment, using a fabric in a similar weight will mean you can see how it fits, feels and moves. Try it on and make any necessary adjustments, such as taking in or letting out seams, before cutting into your precious fabric.
Document Your Changes:
As you work with different patterns and sizes, keep a record of your grading and combining adjustments. This documentation will serve as a reference for future projects, making it easier to achieve the perfect fit every time.
Grading between and combining pattern sizes allows you to achieve garments that fit your body shape precisely. By following the steps outlined in this blog post, you'll be able to create garments that fit your figure and feel more comfortable and give you more confidence. Start with the basics and as you practise, you will find grading and fitting your garments easier with each pattern you make. Even the most experienced sewers have to amend the fit of a garment and tweak things, so don't be disheartened if it takes a few gos, the body is a 3D shape and sometimes a little tricky to get right!
Hopefully this post helps you to grade between and combine pattern sizes! Happy sewing.


Leave a comment
This site is protected by hCaptcha and the hCaptcha Privacy Policy and Terms of Service apply.