This guest post was written by Gabrielle of the blog Bibbity Bobbity Buttons. You can find more of her makes on Instagram @bibbity-bobbity-buttons.
You can shop the Ilford Jacket pattern here.
---
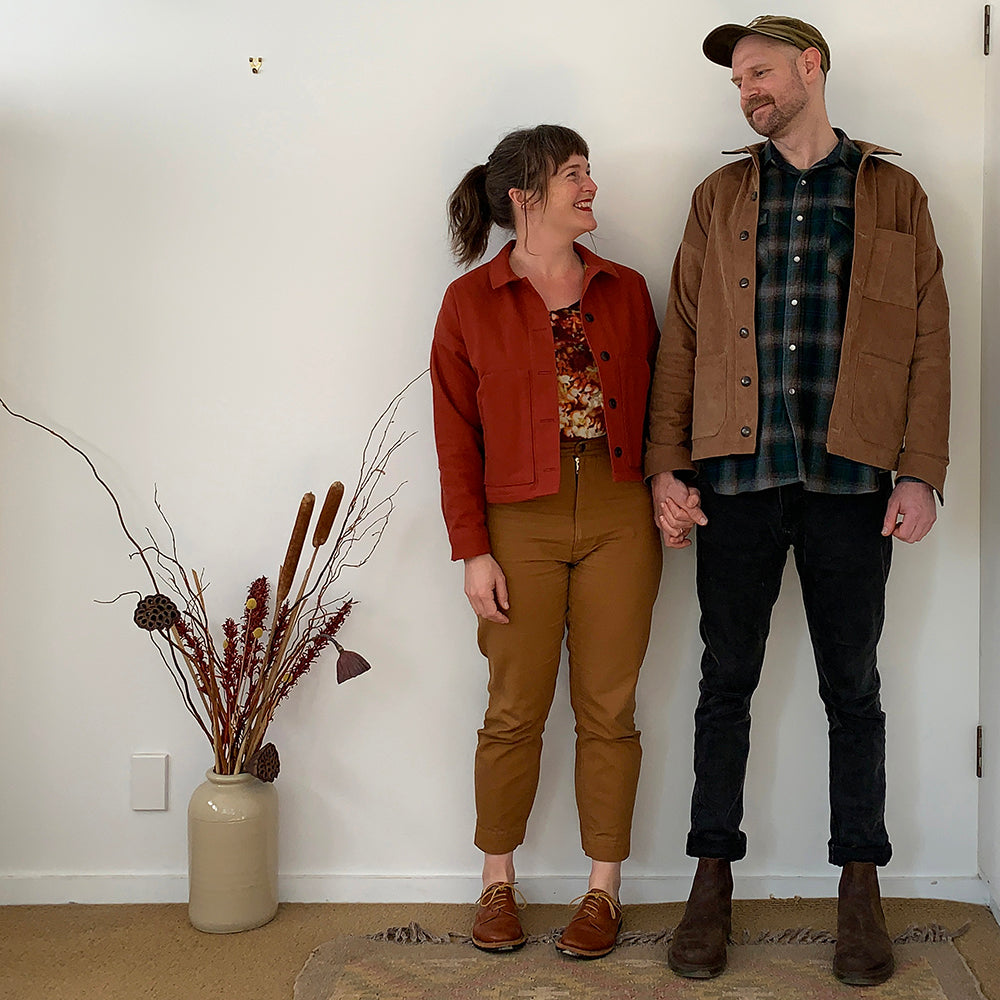
Mismatched-Team-Couple Ilford Jackets:
During Aotearoa, New Zealand’s autumn, I’d been hanging out in the Ilford Jacket hashtag an awful lot, imagining how useful it would be to have a new mid-weight jacket for winter. One morning, I leaned across to show my husband, Justin, photos of the Ilford, saying, “I think I might make one of these for myse—” when he excitedly exclaimed, “Oh yeah! I really like that! I’d like one in navy, or maybe tan!” What a cheeky chops!

Only a week or two after, I got an email from Chelsea asking if I’d like to write a guest blog post for her, serendipitously aligning certain stars and beginning Justin and my team-couple-without-looking-anything-like-a-team Ilford Jackets.
In her recent interview with Love to Sew, Chelsea described the Ilford as a choose your own adventure pattern, and I have to say that has been entirely borne out by seeing Justin and my very different jackets come together. So, without further ado, here’s a run-down of each.
Justin’s Ilford:
Materials: Camel corduroy (from The Fabric Store) with forest-green corduroy (from Miss Maude) as accents on the collar and cuffs. The Moorland buttons are also from Miss Maude.

Size and Adjustments: Justin is 6’ and fits the measurements for an XL. Working off one of his existing jackets we sized down to a M in the body (adding 2.5” to the regular jacket length line) with L sleeves. As he is quite barrel-chested, I tapered the back-pattern-piece in quite significantly. From each shoulder, I ran a diagonal line down the length of each side-seam, finishing about 3” in from the very bottom of the side-seam. This removed the cone-shape he was seeing in profile.

While we got a good fit on the body, the sleeves didn’t work out so well: they were comically short and tight, as muggins here forgot to account for the extra length in his arms! We added 2.5” to the sleeve length (much better!) but he does find the forearms a little tight if he’s wearing anything long-sleeved underneath it. With the benefit of hindsight, I probably wouldn’t have sized-down the sleeves on his jacket, but you live and you learn!

Details: Justin was totally smitten with the idea of the pencil pocket (as was I!) so this was a high-priority addition. He wanted the other pockets to be relatively simple, opting for the straight-rectangle chest-pocket and flapless side pockets with angled corners. Matching the pockets to the lines of the corduroy was sewing-detail-heaven for me, as was nailing a series of gorgeous bar tacks on each corner.


Gabrielle’s Ilford:
Materials: Red duck cotton canvas (from Blackbird Fabrics) with a ginger brushed cotton as the lining (from Miss Maude). Buttons also from Miss Maude.

Size and Adjustments: I’m 5’ 3.5” and my measurements put me at a size M. I wanted to replicate some of the dimensions of another jacket I own, so I sized down to an XS for everything. If you follow my Instagram account, you’ll know I have an almost indecent love of cropped tops and jackets at the moment, so I took 3.5” off the regular jacket length. I’m deeply relieved to report that my extreme sizing down worked out a-okay—no mid-sleeve dramas with this jacket, thank the stars!

Lining: I absolutely love this duck cotton canvas, but I was a bit worried about how cosy it would feel against the skin, so when I saw, first, that Chelsea had a tutorial on her website for lining the Ilford and, second, that Miss Maude was stocking this truly scrumptious brushed-cotton, I knew I had a solution to the problem.


Generally, Chelsea’s directions for lining the Ilford worked super well, but I just could not add the sleeve-placket as directed, which is done when the sleeve seams are already sewn instead of when the sleeve is flat. I think the XS is just too small to manoeuvre around the sewing machine. So, this is how I got around it: I followed all the lining directions as written up to attaching the placket. I then basted the lining and shell sleeve hems together where the placket was going to be stitched, to make sure nothing crazy happened with the alignment. I pulled everything inside-out and then opened both the shell and lining sleeve seams up so I could sew the placket in flat. I then re-closed the sleeve seams and continued on with the cuffs.

I have to say that Chelsea’s sleeve placket pieces and directions are the best I’ve worked with yet! They’re so good, in fact, I’m using a tweaked version of her placket pattern piece on a different shirt I’m working on because they’re just so much better. Bravo for beautiful plackets!


Details: I knew I wanted handwarmers and a chest-and-pencil pocket combo. While the handwarmers were not a problem, because of the amount I’d cropped my Ilford, there’s no real space for the chest-and-pencil pocket (sob!) so I had to let go of that dream detail in the end. I did, however, line the handwarmers with the brushed cotton, which was easy-peasy to do, and I highly recommend it. I also sewed my handwarmers on to the jacket shell before I finished the hem of my jacket, which means all the stitching is hidden under the lining, leaving the insides nice and neat.


And there you have it! Two completely different results from the same pattern! Justin and I proudly wore our mismatched-team-jackets out on our date night last week, looking nothing like a team-couple but with all those secret team-couple feels.
Thank you for reading along!


Leave a comment
This site is protected by hCaptcha and the hCaptcha Privacy Policy and Terms of Service apply.