We love how easy it is to modify the Pogonip Pullover to create different styles. In this blog post we want to share with you how to omit the button placket, and create a zip up collar fastening instead. As well as that, we have a free patch pocket add on for you to download, to create a front patch pocket instead of the welt pockets in the original sewing pattern. Continue reading to find out more.
What you will need:
- Pattern paper, or any off cuts of paper you have
- Pogonip Pattern printed off and cut ready in your size
- Tape
- Pen or Pencil
- Large drafting ruler
- Sewing machine, and usual sewing notions
- Zipper: I used a 20cm gold tooth zipper, but this may vary depending on the size you are making. I am a size Medium for reference. I'll show you in the next step how to decide on a zipper length.
- Bias binding for the front zipper opening, and collar inside edge. I used a 25mm double fold bias binding.
Pattern Modifications and notes:

- Start by adding width to the centre front of piece A, this should match up to lower front B like in the diagram above.
- Measure the amount you added, and add this amount also to your collar F piece, with half the amount on each side to keep the notches in the right place (don't add all the wextra width to one side of the collar)
- You will be omitting the Button Placket (Piece D), the Welt (G), Packable Pocket (M), Pockets (H & I), and all lining pieces.
DOWNLOAD THE FREE PATCH POCKET HERE
You will need to cut X2 patch pockets, 1 outer fabric, and one slightly lighter weight as a lining. I used a double gauze scrap I had laying around!
Fabrics: For my project, I used a fleece that has low stretch, and is medium weight.
Sewing Steps - Pocket:

Start by sewing the patch pocket right sides together, all the way around but leaving a 3/4 inch opening at the bottom of the pocket. Clip corners, leaving the seam allowance (you can grade if you like but as my lining was quite thin I didn't need to). Turn the pocket right side out.


Give the pocket a good press, and sew all the way around the edge of the pocket a few mm in, closing up the hole at the bottom.
Optional you can add some decorative stitches to your pocket to create a quilt like effect, to do this I simply stitched straight lines diagonally across the pocket, and then repeated this the other way to create a diamond like look.


Pin the pocket to the front B piece in the centre, and pin around the outside edge. Sew in place a couple of mm from the edge, leaving the diagonal sides open for your hands.
Sewing Steps - Collar and Zipper


Start by sewing the shoulder seams right sides together of both front A pieces, to back C. Press seams open and finish them if you need to. The fleece I used doesn't fray so I left it unfinished.

Pin right sides together the collar from the front centre neckline, around the back, all the way around to the front again, stitching through just one layer.

Finish the other edge of the collar with bias binding. Then add bias binding to the centre front edges of the collar and front A pieces. Sew the bias binding over the edge, by carefully edge stitching it in place.

Fold the fleece collar edge over the wrong side, encasing the zip inside, and lining up the zipper to the centre front. Tuck the top flap of the zipper to the side as this will get stitched inside the collar fold. Use a zipper foot to sew the bias edge and zipper together, keeping close to the edge of the seam for a nice clean finish.
Repeat on the other side of the zipper, you may need to open the zipper during this process for easier sewing.


Once you have sewn in the zipper, top stitch the collar in place, stitching in the ditch from the front.
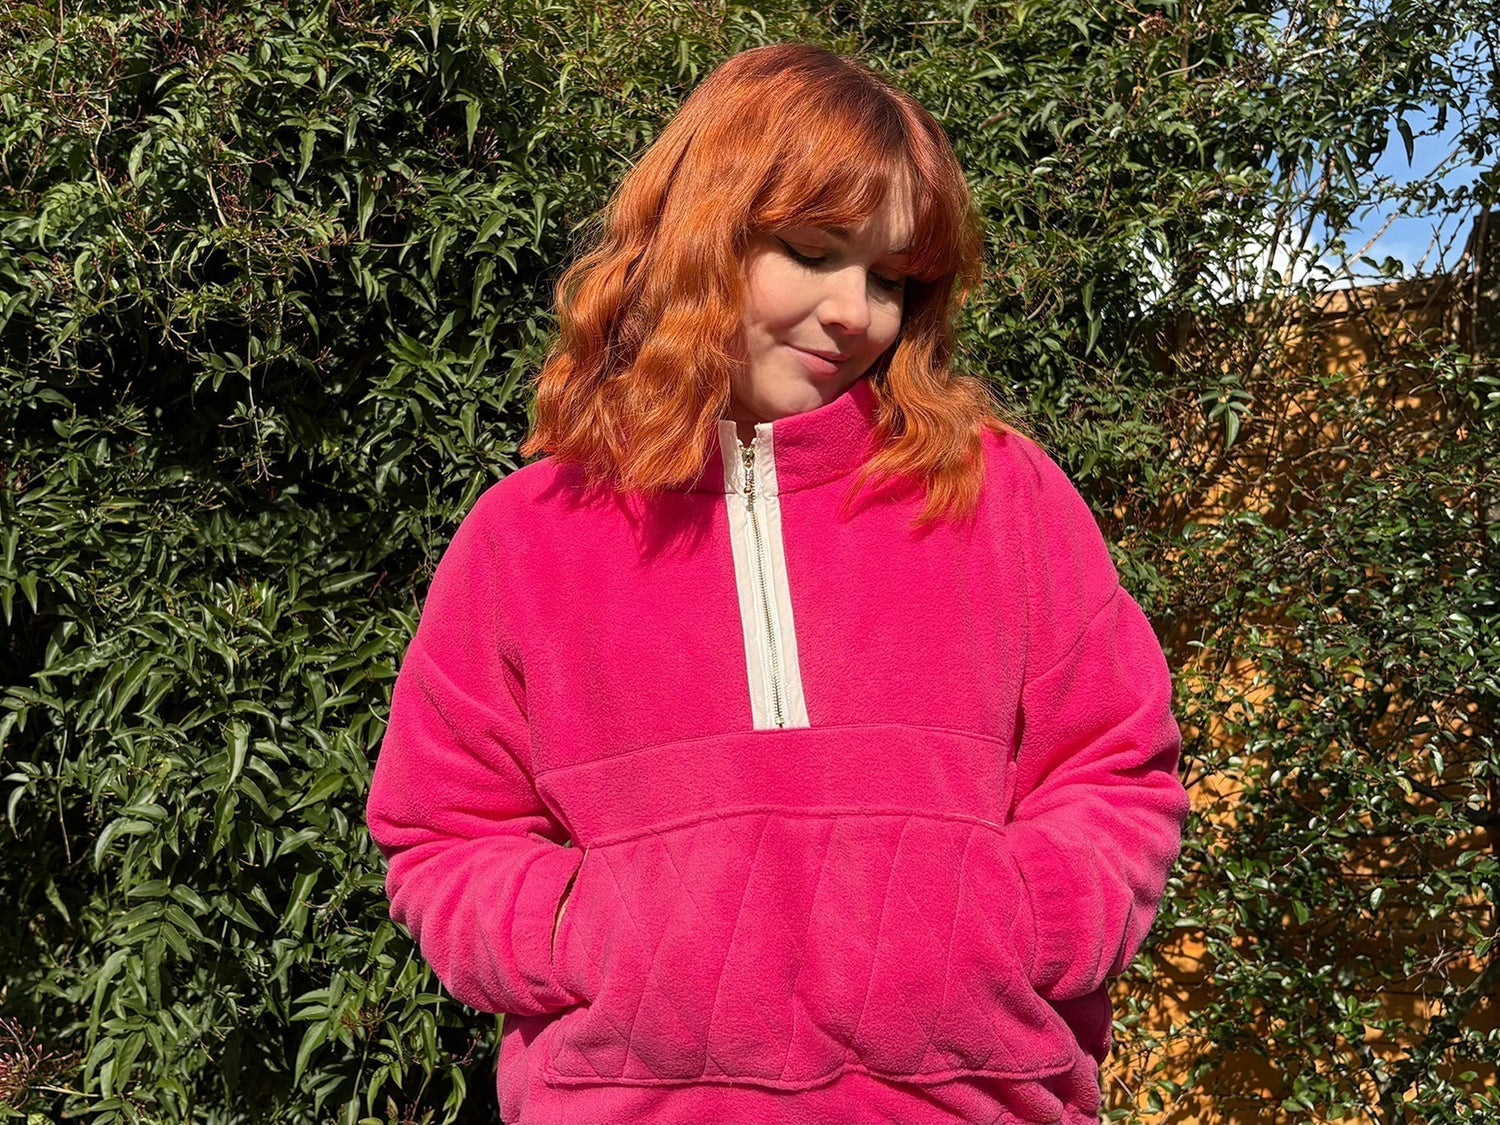
Finish the Pogonip in the same way as the instructions by sewing the lower piece A (the piece with the patch pocket on) to the top piece A, being careful not to sew through the metal of the zipper. Then sew in your sleeves, hem cuffs and sleeve cuffs to finish it off.
Finished Pogonip:


I am so pleased with how it turned out, it's going to be such an easy grab and go piece in my wardrobe that will get a lot of wear all year around. You can have fun with colours, patchwork, and funky details in your Pogonip by using a different zip colour, pocket fabric etc.
If you haven't already got a copy of the Pogonip Sewing Pattern, shop it here.


Leave a comment
This site is protected by hCaptcha and the hCaptcha Privacy Policy and Terms of Service apply.