This Wilder gown hack has been on my mind since last summer but finding the right eyelet fabric in the red/orange shade I wanted was nearly impossible until I realized a few months ago that I could just dye the fabric myself. Like countless sewists I too fell in love with the Wilder gown pattern. Don’t let the simple style lines of this pattern fool you. The hacking possibilities are endless and depending on your fabric choice you can take this dress from easy breezy casual to fancy and chic. Continue reading to find out how I hacked the Wilder Gown to create a Eyelet dress.

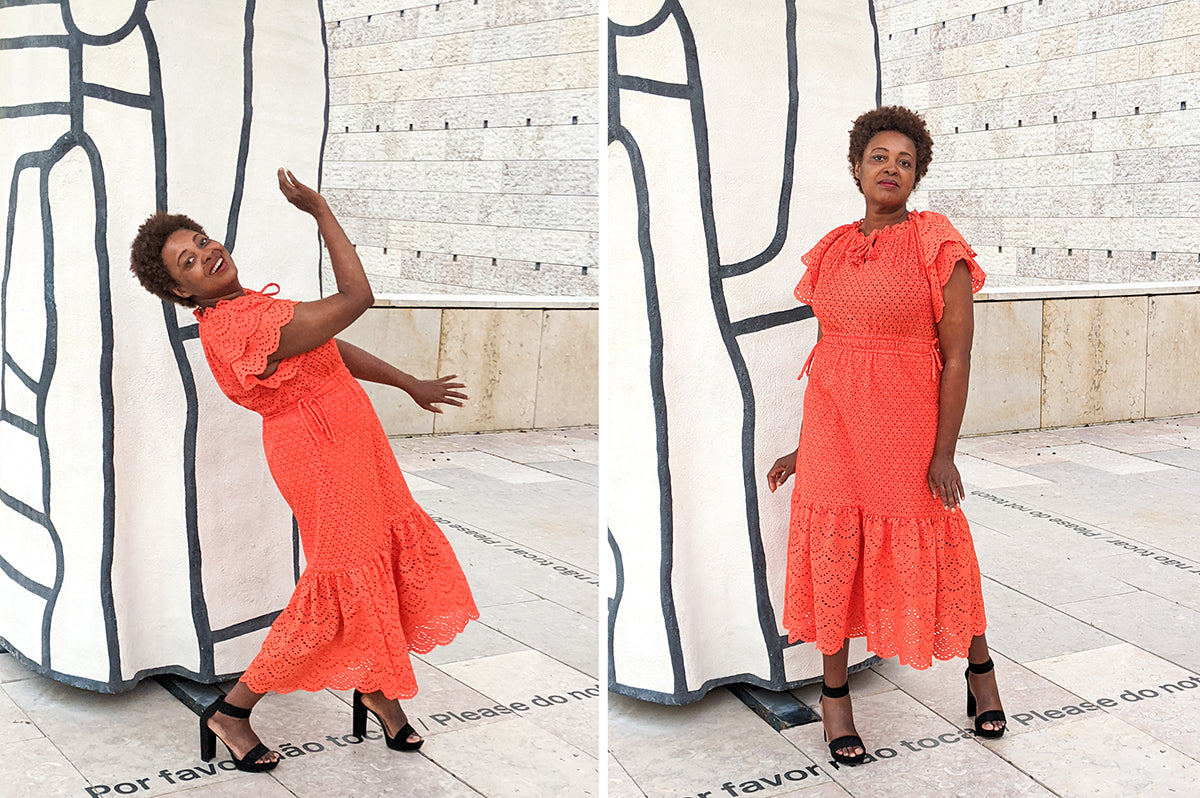
Hi, my name is Pauline from sewuthinkucan.com and @sewuthinkucan on Instagram and I’m excited to show you how I hacked the Wilder gown pattern to make an eyelet midi dress with ruffled details at the neckline, double flutter sleeves and an adjustable drawstring waistline.

Let’s start with my inspiration. I’m a die-hard fan of Ulla Johnson and the clever way she mixes fabrics. Her dresses are full of interesting details and if you love ruffles, look no further. Ulla’s eyelet dresses are effortlessly chic and modern and romantic.


I dyed two different patterned eyelet fabrics using the Puffin’s Bill dye formula from the Rit Dye website. I suspect that the slight difference in shade between both fabrics is due to one of them being off-white rather than plain white or it might just be a botched dye job on my part. You live to learn.

Now onto the hack itself. The Wilder gown was the perfect pattern with its high neckline, raglan sleeves and tiered ruffles. I used the front, back, sleeve, and lower tier pattern pieces. For reference, I cut a size L(10-12) and I’m 1.70m/5’7 tall.

Here are my modifications:
Front piece:
Added 15 inches to the length. Originally it was 18 inches but I removed 3 inches before attaching the bottom ruffle.
I added 1 inch ease at the FBA line for C/D cup since the pattern is drafted for a B cup.

The front piece is cut on the fold in order to add a slit with a facing. The facing is 7 inches long and 2 inches wide. The slit marking is the same as the pattern marking for the neck opening. Mark the slit on the fabric and the facing. Place the facing on the fabric right side together with slit markings matching exactly. Pin in place and sew the facing to the fabric along the slit mark at ¼ inches from the mark. Cut through the slit mark, turn facing to inside and press. Fold the raw edges of the facing in and edgestitch in place.

In order to add my own ruffled neckband using the scalloped edge of my eyelet fabric I removed the built-in neckband. I traced a line from the neckline angle on the pattern to the middle edge and added seam allowance.
Back piece:
Repeat this neckline mod for the back piece.
Cut on the fold and add 15 inches to the length.
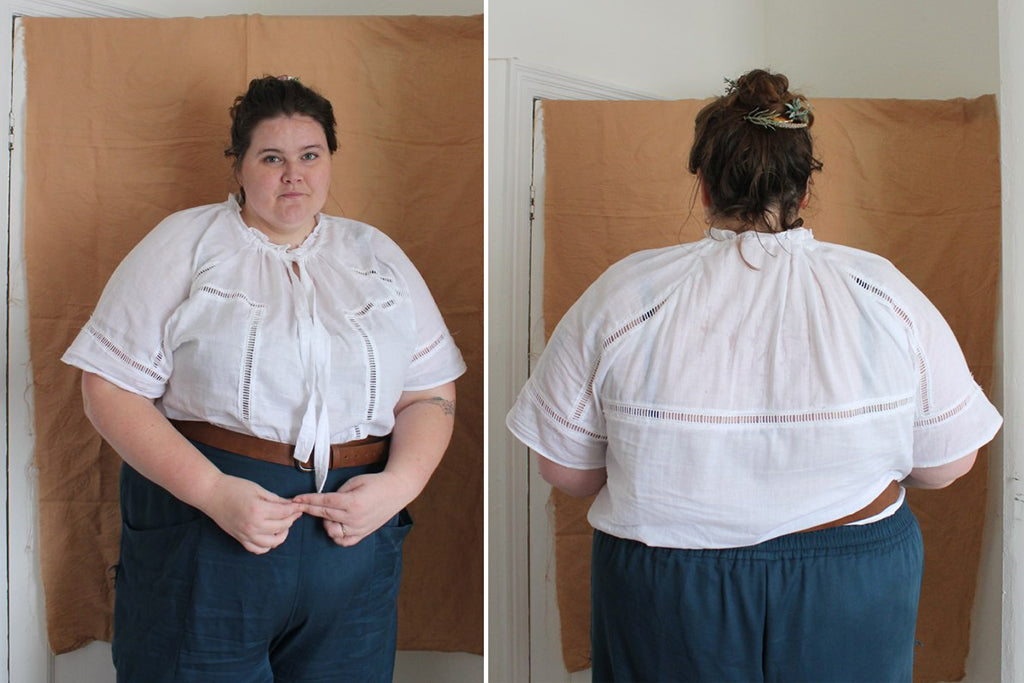
Layered flutter sleeves:
Repeat this neckline mod for the sleeve piece.
Shorten the sleeves by removing 11-12 inches total from the sleeves length. Slash and spread the sleeve after dividing it into 6 pieces vertically. The top edge of the sleeve has 3 inches added width and the bottom edge 9 inches.
Cut bottom sleeves first then remove 4 inches from sleeve length before cutting the top sleeves.

Neckband ruffle:
Length is determined once the neckline is gathered. Measure the length of the gathered neckline and multiply by 2. Cut the neckband on the scalloped edge of the eyelet fabric. Gather the neckband, and attach it to the gathered neckline. Finish it off with bias binding.
Bottom ruffle:
Measure the circumference of the bottom edge of the front and back pieces once they’re attached at the side seams and multiply by 2. Cut the bottom ruffle on the scalloped fabric.
Construction:
The dress is half lined. Only the bottom part is lined.
Cut two pieces of lining fabric the length of the skirt portion without the bottom ruffle and attach them at the side seams. Mark where you want your waistline to hit and attach the lining to the main dress by pinning the top edge of the lining to the waistline along the marking making sure the right side of the lining lays against the wrong side of the dress and the bottom edge of the lining is toward the top of the dress.

Fold the lining over and mark the placement for the tunnels to insert a drawstring. I should normally make buttonholes on each side of the tunnels front and back on the right side of the dress in order to insert the drawstring but I cheated and decided to use the holes in my eyelet fabric instead.
The neck and waist ties are made with self fabric bias binding. Turning the ties right side out on an eyelet fabric is not for the faint of heart. I will later dye some cord and replace both. I did add my diy tassels by slashing through a rectangular piece of fabric, wrapping it around the neck ties and sewing by hand to secure it.

I don’t really like to finish eyelet fabric edges with a serger so I used two of my favorite seam finish methods: HongKong seams and French seams including on the gathered bottom tier which is a first for me. As a result my sleeve construction is a tad different from what the instructions call for. Feel free to follow the instructions if you’re using a different fabric.

I hope you’ll give this fun hack a try. You can even add one more tier to make it a maxi dress. I almost skipped the bottom ruffle after trying on the dress to determine the overall length. Can’t wait to make the mini version sans the added drama of the ruffle! I could just picture it worn with sandals or sneakers.


-
To see more of Pauline's make click here to read her blog & here to follow on Instagram.
Shop the Wilder Gown pattern here, now available in our extended size range XS-7X


Leave a comment
This site is protected by hCaptcha and the hCaptcha Privacy Policy and Terms of Service apply.