Welcome back to the Friday blog, in this post we're showing you have to create a button-up front Bernadette Skirt, omitting the side zipper and also lining the fabric. It's a great sewing hack if you're still unsure about sewing zippers, or prefer the look of buttons on a skirt. Continue reading to find out how to make it.
What you will need:

- Usual fabric requirements for the Bernadette Skirt, depending on the length you're making.
- Buttons (I used 8 for this skirt).
- Lining: this is personal preference, I only lined it as the fabric I wanted to use was semi sheer and not quite stiff enough for what I needed.
- Your usual sewing notions and tools.
Pattern Modifications:


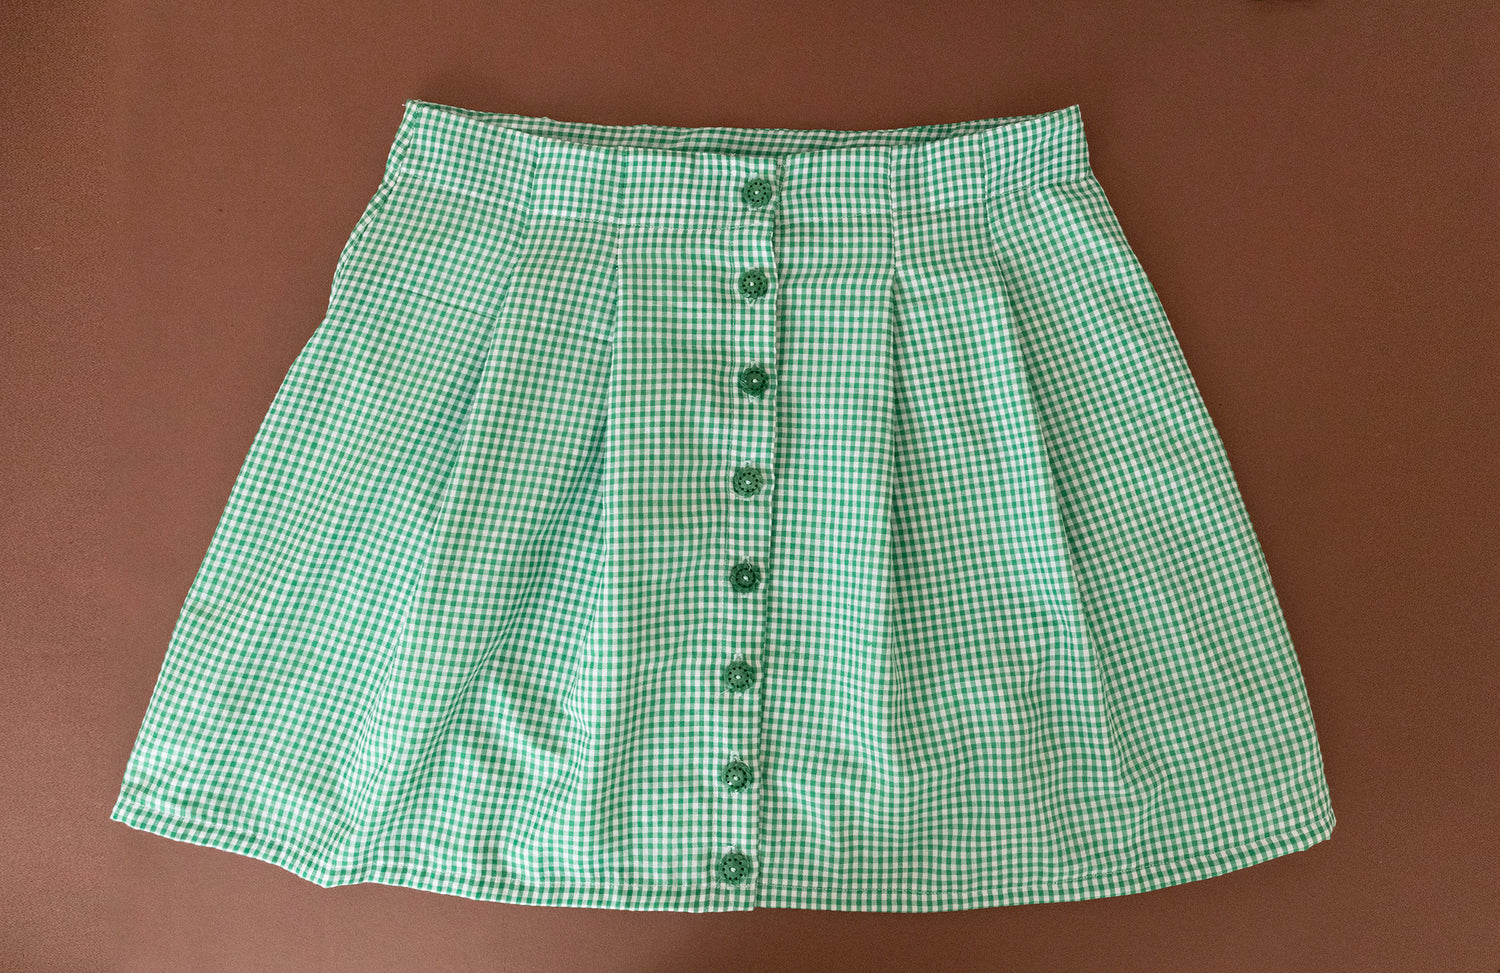
Instead of cutting the front skirt on the fold, you will cut 2 (on the fold of the fabric) which will become 2 mirrored pieces. Add 6.5cm to the centre front, this will become the button placket during the sewing process. (no facing or extra pieces required)!

For the skirt facing pieces (that create the waistband), cut 1 as normal for the back, and another will be cut in half at the middle, creating 2 mirrored pieces to match up with the 2 mirrored skirt fronts. Add 6.5cm to the facing centre fronts.
To add lining, cut the same X1 back piece on the fold, and X2 mirrored front pieces with the added 6.5 cm on the centre fronts. You don't need to cut the facings in the lining fabric.
Instructions:

1. Following the instructions, sew the darts on the back piece, on both the main fabric and lining fabric. Press and finish in your usual method.

* PLEASE NOTE: To line your pieces you can ether sew the back to the side fronts first or sew the lining to the pieces with a baste stitch first. I did the latter and in hindsight I wish I had sewn the side seams toegther and then attached the lining and main pieces together basting across the waist seam. Something to know for next time though!

2. I basted the lining to the main outer piece by basting them together at the sides and waist (top) wrong sides together, match up the darts and side seams.
3. I repeated the process with the lining and outer front pieces, basting them together on the waist and side seams BEFORE add ing the pleats.

4. Pin and sew the pleats as per the instructions, sewing through both the outer and lining fabric, pleating them together. iron the pleats as per the instructions, towards the centre font.

5. Pin together the back and front pieces at the side seams, and stitch. You will be sewing through all 4 layers (lining and main fabric). If you sewed these together prior to the pleats then skip this step. Next time I make this I will sew this step before to hide the seam allowance!
Button Placket Time:
6. Now is a good time to wrap the skirt around you, with the centre fronts meeting and do a fitting. I was glad I did this because I needed to make sure the folds I created for the front placket weren't as big or I would have made it too small. Pop a pin in where the fronts meet.

7. If you don't do a fitting, the usual way to create these front button plackets is to mark on the wrong side 8cm from the centre front edge. However as it was coming up a bit small for me (I am between a size M and L, and I was making a Medium) I marked 7cm from the centre front using a fabric pen.


8. Iron the centre front edge in towards the wrong side under by 1cm. Then fold again matching that folded edge to the marking line you just made, in my case it up up to the 7cm mark. iron this fold, pin in place and topstitch the placket 1/4" from the folded edge.
9. Repeat this on both centre fronts.


10. Sew the facing back to the facing side seams, iron the seam open, and then pin the facing right sides together to the skirt waist. I then trimmed the centre front of the facing, leaving 1cm extra on the front, and ironed it in (see photo for reference. Sew the facing to the skirt, keeping that 1cm fold in place.

11. Hem up the skirt, check the length before hemming as you can still take it up if you need to. I hemmed mine by folding it up 1cm and another 1cm and stitching all the way around.

12. Depending on how many button holes you want, mark on using a tape measure (or this handy button hole measuring ruler) to get a precise measurement between each button. I used 8 buttons so needed 8 button holes.

13. Use your button hole stitch and sew on each button holes. Open them up using a pin at the top of the button hole and a seam ripper to carefully cut them open (or a button hole cutting tool if you're fancy)!
14. Sew on your buttons either hand stitching or with your machine.
Top Tip:
If you're working with drapey or light fabrics, add a bit of interfacing to the extra centre front on the wrong side. This will help stiffen and strengthen the fabric for the button holes and buttons.


That's it! It's a great pattern and sewing hack to add a button up front to skirts without the need for a button placket. Add the belt loops and Bernadette Bag if you like, but I decided not to for this make. It looks so cute styled with a t-shirt and sandals and I can't wait to have fun putting together cut skirt outfits! I even have enough gingham fabric left to make a matching top.


Leave a comment
This site is protected by hCaptcha and the hCaptcha Privacy Policy and Terms of Service apply.