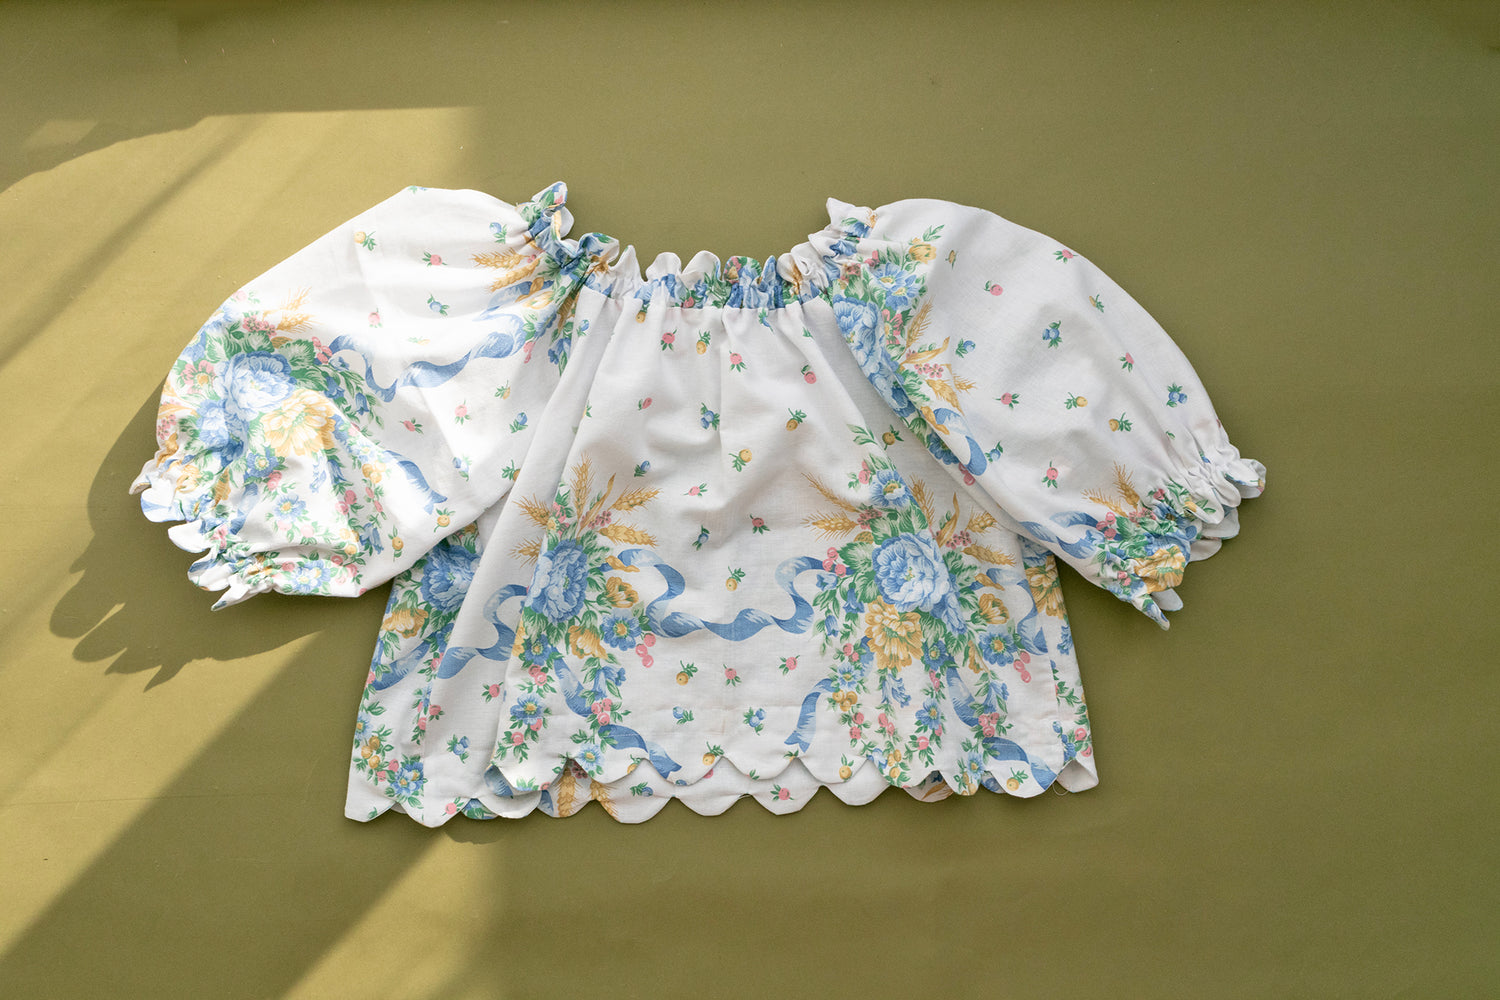
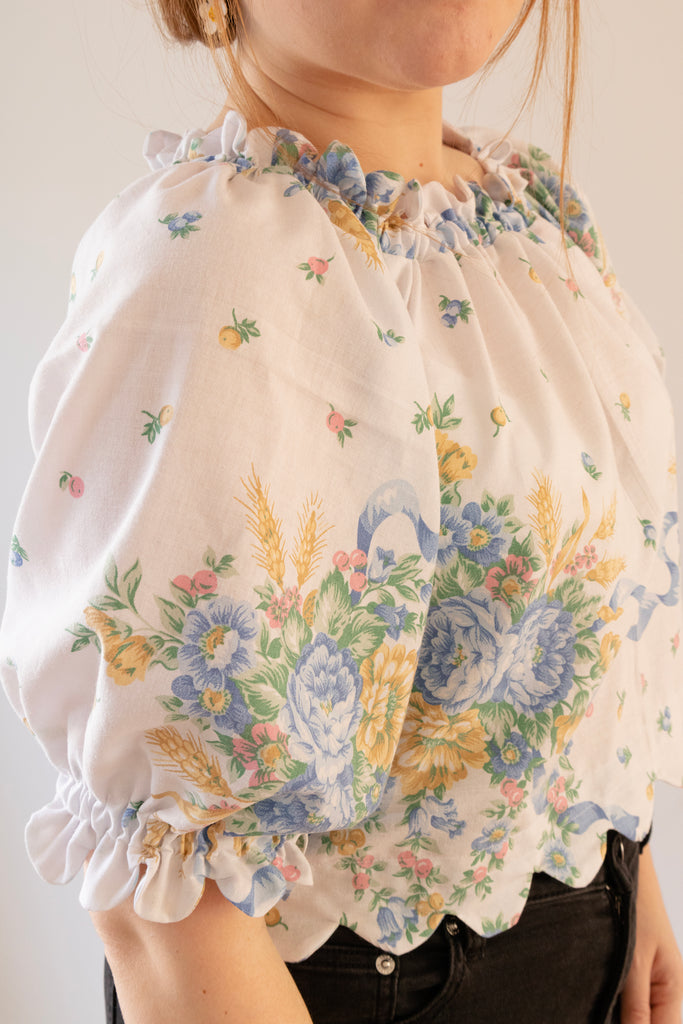
The Avenir Jumpsuit is a great base pattern that lends itself to lots of potential hacks and because of the separate top pattern pieces this sewing hack is super straight forward. In this blog post we show you how to create a puff sleeve scallop hem top. Continue reading to find out how.
The fabric I have used is a vintage cotton tablecloth I picked up from a charity shop, it's been in my stash for a while!
Pattern adjustments:

The pattern pieces you need for this project are:
- Front (A) - Cut 1 on fold
- Back(B)-Cut1onfold
- Sleeve (C) - Cut 2 (This will amended, see below)
- Neckline Casing (D) - Cut 2 (This will amended, see below)
- Waistband Casing Front (H) - Cut 1 (This will amended, see below)
- Waistband Casing Back (I) - Cut 1 (This will amended, see below)
- NEW PIECE: sleeve casing cut 4

Hacking the sleeve pattern:
- Draw a straight line in the centre of your sleeve, then draw 2 other lines each side of this, 2 inches apart.
- Cut down each line to the top (shoulder seam) of the sleeve, leaving a few mm from the edge, not to cut all the way through.

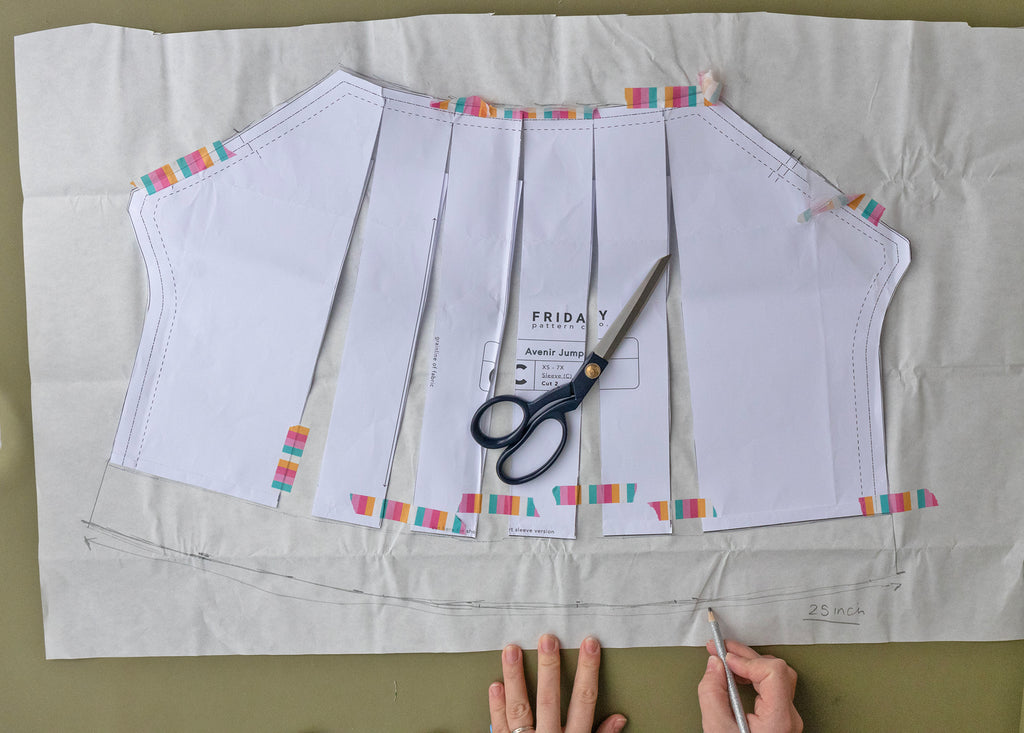
- Tape the pattern to tracing paper by measuring each cut line an inch apart and tape it down. You will be adding 5 inches to the sleeve hem.
- Try to make sure the pattern sits as flat as possible on the tracing paper, then trace around the new created shape.
- I also added 2 inches to the bottom of the sleeve for added bulk and to make room for the scallop edge.

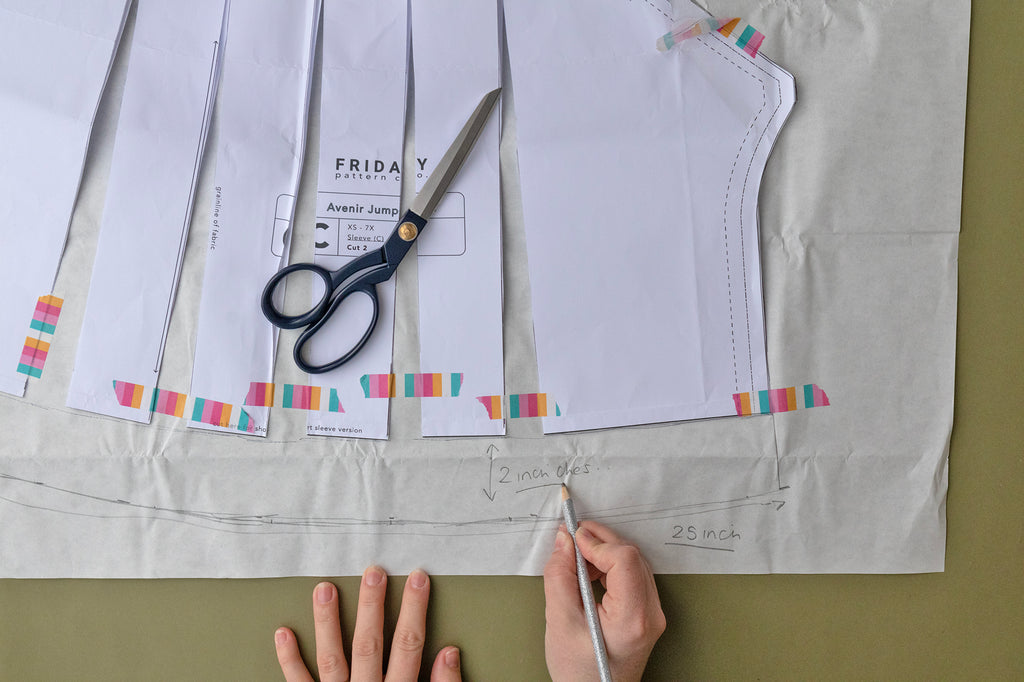
- To make the scallop edge guides, lay the new hem of your sleeve on the tracing paper, trace the shape around the bottom (mine measured 25 inches, depending on your size this will vary) - then measure 2 inches up from the bottom line to create a 2 inch panel.
- Use a circular item you have to create the semi circle shapes of the scallop - I used a camera lens cap! as the bottom edge measured 25 inches, I wanted to make sure the scallop edge would fit perfectly. Taking off the seam allowance I roughly knew I needed 12 scallops about 2 inches wide per scallop. Mostly though, I did this by eye and trial and error until they looked right.


- Repeat the process with the hem of the top (use the waistband casing pieces).
- Neckline Elastic Piece amendments: Make the piece 4 inches - this piece will be folded in half (like in the pattern instructions) and need to still be 2 inches high to fit the scallop edge and elastic casing. You will cut 4 of these (2 per each sleeve).
Sewing Steps:

- Follow the pattern instructions part 1,2, and 3 to assemble the sleeves and front piece A and black piece B.
- Follow instruction 4 for the Neckline Elastic Casing. Once pressed wrong sides together we can make a start on the scallop edging.

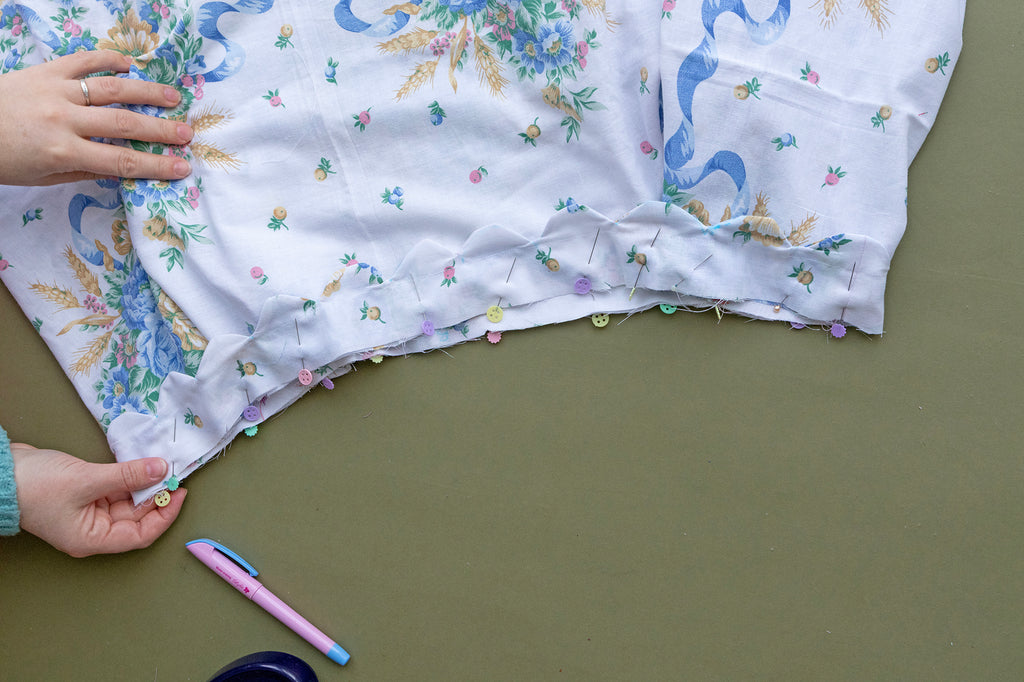
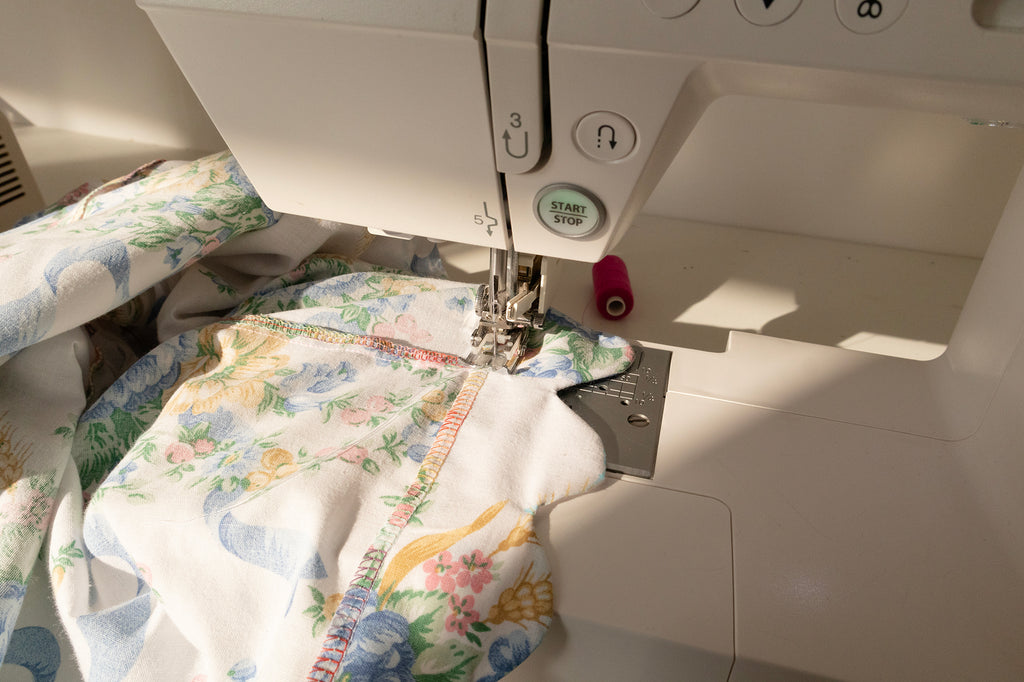
3. Using the scallop template pattern you made earlier, cut the scallop line of it and place it on top of the neckline casing. Using a fabric pen, pencil or chalk, trace the scallop lines onto the fabric, with the scallop edge lined up against the folded edge of the casing.


4. Time to sew the scallop edge! This process can take a while, but you just have to take it slow and steady - if you have a freehand embroidery foot (quilting foot) then even better, use that! To make the edges of each scallop nice and crisp, I double backed a few stitches at each pivot point of the scallop.

5. Once you sew the scallop all the way around, trim the stitched seam allowance edge and clip close into the point of each scallop.
6. Turn the scallop right side out and slowly roll each seam and iron the scallop edges.

7. Top stitch below the scallop edge, as seen in the photo above (roughly an inch from the edge).
8. Pin the scallop edge neckline casing piece to the top neckline, following the main pattern instructions 5&6. Sew around leaving a gap to insert your elastic. The elastic length is the same as the usual recommended size in the instructions (although I made mine slightly smaller as I have narrow shoulders).
TOP TIP: Don't sew the elastic casing shut until you try the top on at this point and make sure you're happy with how it sits on your collar bone/shoulders.

9. Repeat the process with the sleeve casing pieces. Sew the casing pieces right sides together on the short side seams, press seam open. Overlock/finish the bottom/longer edge of the casing.

10. Pin the casing piece right sides together on the sleeve hem and repeat the same scallop process as the neckline - tracing the scallop template onto the fabric with a pen, sewing the scallops, turning them out and ironing, top stitching the scallop down and then lastly creating an elastic channel stitch (like with the neckline casing) - Repeat on both sleeves. To find the length of elastic for your sleeves, I simply put the elastic around my arm to measure them that way, then cut 2 the same - 1 per sleeve. Channel the elastic through the sleeve hem casing, then sew the hole shut. Repeat on both sleeves.

11. Repeat the scallop process on the top hem, using the waistband casing front & back pieces. Finish one long edge like with the sleeve, pin right sides together the raw edge of the casing to the hem of the top, draw on the scallop template, sew the scallops, turn the right way and iron them out.
12. Lastly, top stitch the casing to the top, just below the finished edge of the casing, all the way around.

That's it! The instructions may sound a little confusing but honestly it's so easy to make. The only time consuming thing is sewing all the scallop edges, but it's also really therapeutic and a great process to get stuck into for some mindful sewing.
I'll we wearing the top down on my shoulders in the summer, and worn with jeans or pants like the Saguaro pants!


Leave a comment
This site is protected by hCaptcha and the hCaptcha Privacy Policy and Terms of Service apply.